 Garden

Affiliate Disclosure
Some links on this page are affiliate links. As an Amazon Associate, we earn from qualifying purchases — at no extra cost to you. We do not buy, test, or physically handle the products we cover; our rankings come from aggregated owner reviews, ratings and expert consensus. Commissions never change our verdicts. How we rank · full disclosure.
Steam milk to 140–155°F, and stop adding air by the time it reaches 100°F. Put the wand tip just under the surface and let it hiss for two or three seconds to introduce air, then sink the tip slightly and angle it off-center so the milk spins in a whirlpool. That spin is what folds the big bubbles into the body of the milk and turns them into microfoam. Stop the moment the pitcher gets uncomfortable to hold, tap it once, swirl, and pour.
What you need
- A stainless pitcher sized to your drink. Fill to just below the spout — about a third full. Too big and the wand cannot spin the milk; too small and it climbs out.
- Cold milk, straight from the fridge. Cold milk gives you more time in the window where air can be added. Never re-steam milk that has already been steamed; the proteins will not rebuild the foam.
- A machine with real steam. A weak wand that produces wet steam will heat milk without texturing it. This is worth weighing when buying — see our espresso machine ranking.
- Optional: a thermometer, until your hand learns the temperature.

The technique, step by step
Step 1: Purge the wand
Open the steam valve for a second into the drip tray before the milk goes anywhere near it. Condensed water sits in the wand between uses and if you do not blow it out it goes straight into your milk, thinning it. Wait for a dry, sharp hiss.
Step 2: Set the tip just under the surface
Fill the pitcher about one third with cold milk. Put the tip a few millimeters below the surface, off-center — roughly at the four o'clock position if you are looking down at the pitcher — with the pitcher tilted slightly. Turn the steam fully on. Half-open steam valves make wet steam and wet steam makes flat milk.
Step 3: Add the air, and only at the start
For the first two to four seconds you want a light tsk-tsk-tsk sound, like tearing paper slowly. Each of those sounds is a small amount of air entering the milk. This is the stretching phase, and it must finish before the milk passes about 100°F — roughly when the pitcher stops feeling cold. Cappuccino wants more stretching, a flat white or latte wants less.
The most common mistake in home milk steaming is stretching for too long. Air added after the milk warms will not break down; it stays as big bubbles and gives you dry, meringue-like foam.
Step 4: Sink the tip and spin
Raise the pitcher a fraction so the tip sits just under the surface without breaking it. The milk should start rotating in a smooth vortex, pulling the foam from the top down into the body. This is texturing, and it is where microfoam is made — thousands of bubbles too small to see, giving milk the consistency of wet paint rather than bubble bath. Keep it spinning without any further hissing.
Step 5: Stop at the right temperature
Cut the steam at 140–155°F. With a thermometer, aim for 150°F. Without one, hold the base of the pitcher with your bare hand and stop the instant it becomes uncomfortable — on a thin stainless pitcher that is close to 150°F. Past about 160°F the whey proteins denature and the milk turns flat and faintly cooked, and past 170°F it tastes scalded.
Step 6: Purge again, immediately
Wipe the wand with a damp cloth and blast a short burst of steam before the milk on it dries. This takes three seconds and prevents the single most common repair in home espresso.
Step 7: Groom and pour
Tap the pitcher once firmly on the counter to pop any large surface bubbles, then swirl it until the surface looks glossy, like fresh paint. Pour within about thirty seconds; milk separates into foam and liquid quickly, and swirling again will not fully fix it.
Temperature and texture targets
| Drink | Foam depth | Stretching time | Target temp |
|---|---|---|---|
| Flat white | ~0.2 in | 1–2 seconds | 140–150°F |
| Latte | ~0.4 in | 2–3 seconds | 145–155°F |
| Cappuccino | ~0.8 in | 4–6 seconds | 145–155°F |
| Hot chocolate / chai | Any | 4–6 seconds | 150–160°F |

Which milk foams best
Foam is built by protein and stabilised by fat. That is why whole dairy milk is the easiest to work with and the most forgiving: enough protein to build structure, enough fat to keep it glossy and drinkable. Skim milk foams faster and higher but the foam is dry and stiff, which is why cafes that use it for cappuccinos still reach for whole milk for a flat white.
Among non-dairy options, barista-formulated oat milk is the reliable choice — the barista versions exist precisely because standard oat milk lacks the fat and stabilisers to hold foam and often splits when it meets hot, acidic espresso. Barista soy is next best. Standard almond, rice and coconut milks are difficult: they foam thinly, collapse fast, and curdle against a hot shot more often than not. If you use one of these, steam a little cooler and pour immediately.
How to steam milk without an espresso machine
You do not need a steam wand to get good foam, only heat plus agitation.
- Electric frother. Heats and aerates in one step and gets closest to a steam wand. Look for one with a temperature setting rather than a fixed cut-off — see our milk frother ranking.
- French press. Warm milk to about 150°F, pour into the press no more than a third full, and plunge briskly for 30 seconds. It makes genuinely good foam. Any french press works.
- Handheld whisk. Warm the milk in a tall, narrow jug and run the whisk just under the surface for 20 seconds, then sink it and spin — same physics as a steam wand.
- Jar and microwave. Half-fill a jar, screw the lid on, shake hard for 30 seconds, take the lid off and microwave for 30 seconds. The heat sets the foam. Crude, and it works.
Pair any of these with a moka pot or a manual espresso maker and you have a latte without a steam wand in the house.
Troubleshooting
| Problem | Cause | Fix |
|---|---|---|
| Big bubbles, stiff foam | Air added after 100°F | Finish stretching in the first few seconds |
| No foam at all | Tip too deep, or wet steam | Raise the tip to just under the surface; open the valve fully |
| Milk tastes cooked | Over 160°F | Stop at 150°F; use the hand test |
| Milk sprays out | Pitcher over-filled or tip too shallow | Fill one third; sink the tip slightly |
| Foam collapses before pouring | Not textured, only stretched | Spin the whirlpool for the whole heating phase |
| Steam dies mid-jug | Single boiler running out of steam | Wait for full pressure; steam in smaller volumes |
Gear that helps
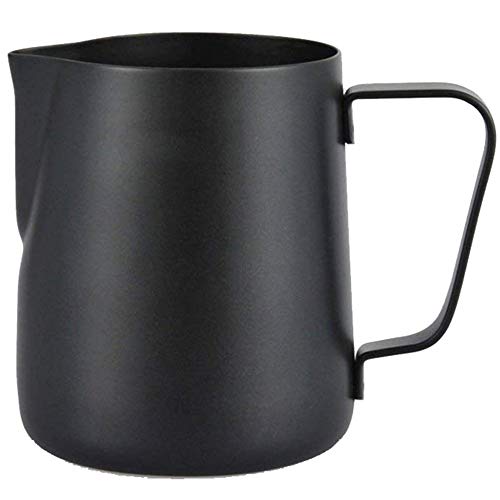
Best for the one piece of equipment that changes milk more than the machine does
- Stainless steel with a sharp pouring spout for latte art
- Sizes suited to 6–12 oz drinks
- Thin walls so you can feel the temperature through the metal
- Dishwasher safe
Why buy it: a pitcher sized to your drink is what makes the whirlpool possible — too big and the wand cannot spin the milk, too small and it climbs out.

Best for cafe-quality foam with no espresso machine involved
- Induction heating with adjustable temperature up to about 175°F
- Separate latte and cappuccino frothing discs
- Cold froth setting, 25-oz capacity
- Dishwasher-safe jug
Why buy it: the temperature dial is the reason it beats cheaper frothers — you can stop at 150°F instead of scalding the milk at a fixed setpoint.

Best for foam with no electricity, no batteries and nothing to break
- Borosilicate glass carafe, microwave safe
- Plunger screen aerates in about 30 seconds
- No batteries or power needed
- Dishwasher safe, 8-oz capacity
Why buy it: warm the milk in the carafe, plunge for half a minute, and you have foam — the cheapest method that actually works.
We do not buy or physically handle the products we rank — our picks come from aggregated owner reviews and expert consensus, explained on how we rank.
Where to go next
Now that the milk is right, get the shot right: how to pull an espresso shot and how to dial in espresso grind. If your espresso is fighting you, read why espresso tastes bitter and why espresso tastes sour. Shopping for hardware? The best espresso machines and the best milk frothers. Everything sits under the small kitchen appliances hub.