 Garden


Affiliate Disclosure
Some links on this page are affiliate links. As an Amazon Associate, we earn from qualifying purchases — at no extra cost to you. We do not buy, test, or physically handle the products we cover; our rankings come from aggregated owner reviews, ratings and expert consensus. Commissions never change our verdicts. How we rank · full disclosure.
Replacing a broken sprinkler head takes about 20 minutes and costs $4 to $25 in parts. Shut the water off, dig a small hole around the body, unscrew it counterclockwise from the riser underneath, screw the matching replacement on hand-tight, backfill so the top sits flush with the soil, then run the zone and set the arc and radius. No permits, no glue, no plumbing skill. The only genuinely important decision is choosing a replacement whose precipitation rate matches the other heads on that zone — get that wrong and you make the whole zone impossible to schedule.
We do not install or service irrigation; part rankings come from aggregated owner reviews, described in how we rank. Hub: watering and irrigation.
First, work out what actually broke
Not every misbehaving head needs replacing, and swapping the wrong part is how a Saturday turns into a weekend.
| Symptom | Most likely cause | Fix |
|---|---|---|
| Geyser or fountain instead of a spray | Cap sheared off, usually by a mower or a car | Replace the head |
| Head will not pop up | Low zone pressure, or grit in the wiper seal | Fix the broken head elsewhere on the zone first; then clean the internals |
| Pops up but sprays weakly | Clogged nozzle or filter screen | Pull the internal assembly, rinse the screen, reinstall |
| Head stays up after the cycle | Retract spring failed or grit in the riser | Clean; replace if the spring is broken |
| Sprays the sidewalk, misses the lawn | Arc or radius knocked out of adjustment | Adjust from the top with a screwdriver — no digging |
| Head sits below turf level | Body has settled; soil built up around it | Dig out, add a soil bed under it, reset flush |
| Puddle appears after the zone shuts off | Low-head drainage through the lowest head | Replace with a body that has a built-in check valve |
| Whole zone weak, several heads poor | Zone overloaded, or a broken lateral underground | Not a head problem — see below |
That last row matters. If several heads on one zone are all weak at once, the head is not the problem. Either the zone is asking for more flow than the supply can deliver — the most common design fault in DIY systems — or a lateral has cracked underground and is dumping water into the soil. Check what your supply can actually carry with the water flow rate calculator and the sprinkler zone capacity calculator before you buy parts.

Tools and parts
- A replacement head that matches the type, pop-up height and nozzle series of its neighbors
- A trowel or a small spade, and a piece of cardboard or a tarp to pile soil on
- Flat-blade screwdriver for arc adjustment; a rotor adjustment key if your rotors use one
- Teflon tape (optional and often unnecessary — most bodies seal on an O-ring or a tapered thread)
- A spare riser or a swing-pipe assembly, in case the riser snapped along with the head

Best for replacing a cracked or sunken 4 in. pop-up in a lawn or bed strip
- 4 in. pop-up body with a variable-arc nozzle, 0° to 360°
- Adjustable radius roughly 8–15 ft
- Co-molded wiper seal that keeps grit out of the riser
- Standard 1/2 in. female thread — fits most existing risers
Why buy it: the variable-arc nozzle means one part number covers corners, edges and full circles, so a five-pack in the garage covers every spray failure you will have.

Best for open turf where a rotor throws 22 to 52 ft
- Adjustable arc from about 40° to 360°
- 22–52 ft throw depending on nozzle and pressure
- Twelve interchangeable nozzles supplied
- Arc adjustable from the top without digging
Why buy it: the industry default rotor for a reason — arc and radius adjust from above ground with a screwdriver, so a misaimed head is a two-minute fix rather than an excavation.
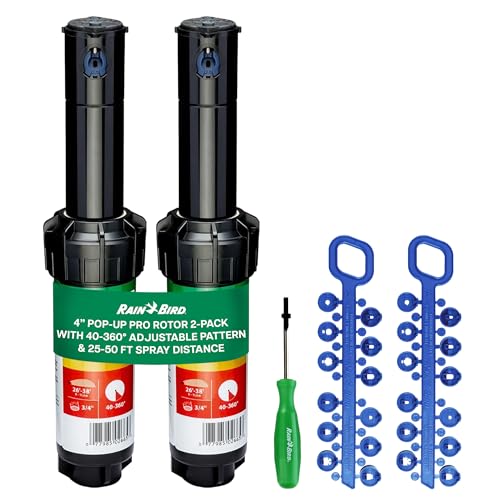
Best for matching an existing Rain Bird 5000 system
- Rain Curtain nozzle set for even close-in coverage
- 25–50 ft radius depending on nozzle
- Memory arc returns to the set pattern if turned by hand
- Standard 3/4 in. inlet
Why buy it: matched precipitation matters more than brand loyalty — if your zone runs 5000s, replacing like with like keeps the zone applying water at one rate.

Match the replacement properly
This is the step that separates a repair from a new problem. Within a single zone, every head should apply water at roughly the same rate — irrigation people call this matched precipitation, and it is what makes a run time mean anything.
- Never mix spray heads and rotors on one zone. Fixed sprays apply water roughly three to four times faster than rotors. A run time that suits one badly over- or under-waters the other, and no controller can fix it.
- Match pop-up height. 4 in. bodies are standard in turf; 6 in. and 12 in. bodies exist for beds and tall grass. A 4 in. head in a bed of ornamental grasses sprays into foliage.
- Match the nozzle series and radius. A 15 ft nozzle among 12 ft nozzles overthrows onto the driveway.
- Thread size is usually the easy part. Most spray bodies are 1/2 in. female inlet, most rotors 3/4 in. Brands interchange freely at that level.
The replacement, step by step
- Shut off the water. Turn the controller off, close the system isolation valve, and relieve pressure by running the zone for a few seconds or opening a drain. Do not unscrew a head on a live lateral.
- Cut a clean hole around the head. Slice a circle of turf 6 to 8 inches out from the body with a trowel and fold it back like a flap rather than chopping it up — it goes back and knits within a fortnight. Pile the soil on cardboard so none of it falls into the hole.
- Expose the riser. Dig down until you can see where the body threads onto the riser or swing pipe, usually 4 to 8 inches down. Keep soil out of the opening; grit that gets in here ends up in every nozzle on the zone.
- Unscrew the old body counterclockwise. Hold the riser still with your other hand so you do not twist the fitting off the lateral below. If the riser turns with it, stop and dig further — a snapped riser is a bigger but still simple repair.
- Screw the new body on hand-tight. Hand-tight is genuinely enough on these plastic threads; a wrench cracks them. Teflon tape is optional and can actually cause over-tightening.
- Set the height before you backfill. The top of the cap should sit flush with finished grade, or a hair below it. Proud of the grade and a mower will take it off. An inch low and it sprays into thatch.
- Backfill in layers and firm it. Push soil in around the body a few inches at a time, pressing as you go so the head does not settle over the next month. Fold the turf flap back and step it down.
- Run the zone and adjust. Set the arc first, then the radius. Aim so the spray from each head reaches the neighboring heads — that overlap, called head-to-head coverage, is deliberate and is what stops dry rings between heads.

Mistakes that turn a 20-minute job into a bad afternoon
Working on a pressurized line. Dirty water in the face, and soil sucked into the open riser.
Over-tightening. These are plastic threads sealing on an O-ring, not steel pipe. Hand-tight, then stop.
Twisting the riser. Hold the riser while you unscrew the body, or you will snap the fitting at the lateral and be digging a much larger hole.
Setting the head too high. The most common repeat failure. A head standing proud of the grade is the next one a mower removes.
Backfilling loose. The body settles over a few weeks, ends up below grade, and sprays into the turf. Firm the soil as you go.
Assuming one bad head is the whole problem. If the zone was weak before the head broke, fixing the head will not fix the zone.
When to stop and call someone
Head replacement is comfortably DIY. Three situations are not. A broken lateral underground — signaled by a soggy patch that never dries and several weak heads on one zone — means locating and cutting into buried pipe, and unless you enjoy that kind of afternoon it is worth paying for. A leaking or failed valve in a valve box, particularly one that will not shut off, is a plumbing job with a real flood risk. And anything involving the backflow assembly should go to a certified tester, because in most US jurisdictions that device is required by code, must be a specific approved type, and has to be tested annually — it protects the drinking water supply, and it is not a part to improvise on.
While you are out there, fixing broken heads is genuinely worth money: EPA WaterSense reports that a household with an automatic irrigation system that is not properly maintained and operated can waste up to 25,000 gallons of water annually, and a single geysering head accounts for a large share of that on its own.
Next: what is a sprinkler zone · how to winterize a sprinkler system · how deep to bury sprinkler lines · best sprinkler controllers · hub: watering and irrigation.