 Garden


Affiliate Disclosure
Some links on this page are affiliate links. As an Amazon Associate, we earn from qualifying purchases — at no extra cost to you. We do not buy, test, or physically handle the products we cover; our rankings come from aggregated owner reviews, ratings and expert consensus. Commissions never change our verdicts. How we rank · full disclosure.
There are exactly two correct ways to connect a portable generator to your house wiring: a transfer switch, or an interlock kit on your existing panel. Both must be installed by a licensed electrician, and in most US jurisdictions both require a permit and an inspection. Expect roughly $500 to $1,500 installed for a transfer switch and $150 to $600 for an interlock kit as of 2026. Anything else — most notably plugging the generator into a wall outlet — energizes the utility line and can kill a line worker.
1. Backfeeding. Never plug a generator into a wall outlet with a double-male cord to power the house. It pushes power back through the utility transformer onto the distribution line at thousands of volts, where a lineman working what he has confirmed is a dead line can be electrocuted. It also bypasses your main breaker entirely.
2. Carbon monoxide. A portable generator emits as much CO as hundreds of cars, and the CPSC links more than 100 US deaths a year to generator CO. It is colorless and odorless. Run the generator outdoors only — never in a garage, basement or under a carport, and an open door does not help — at least 20 feet from the house, exhaust pointed away from doors, windows and vents, with CO alarms on every level indoors. See the CPSC Carbon Monoxide Information Center and OSHA on electrical hazards.
The three methods, ranked by what they actually get you
Method 1 — Extension cords to individual appliances
The only method that requires no electrician and no permit. You run heavy-gauge outdoor-rated extension cords from the generator directly to the refrigerator, a lamp, a space heater and so on. It works, it is legal, and it costs the price of the cords.
What it cannot do is power anything hard-wired — your furnace, your well pump, your sump pump, the lights in the ceiling. Those are the loads that matter most in a winter outage, and none of them has a plug. It also means a door or window propped open around a cord, which is the exact geometry that lets CO into the house.
Method 2 — Interlock kit
A metal plate that mounts on your panel's dead front and mechanically prevents the main breaker and a dedicated generator backfeed breaker from being switched on at the same time. It costs $50 to $150 for the kit plus a breaker and inlet box, and $150 to $600 installed depending on the panel and local labor rates.
The advantage over a transfer switch is that the whole panel is available — every circuit in the house can be fed, and you choose which ones to switch on. The corresponding responsibility is that you manage the load: nothing stops you from turning on more than the generator can supply. The critical detail is that the interlock must be the kit listed for your specific panel brand and model. Universal or printed plates are not listed, may void the panel's listing, and will fail inspection.
Method 3 — Manual transfer switch
A small sub-panel installed beside your main panel, with six to ten circuits moved into it and a weatherproof inlet on an exterior wall. Each circuit gets a three-position switch: Line, Off, Gen. It is the method most electricians default to, and the one most homeowners are happiest with.
The upside is that it is idiot-proof under stress. At 2 a.m. in a storm you flip six labeled switches instead of making decisions about load. Better units include watt meters on each leg so you can see how loaded the generator is and balance the two 120V legs. The downside is cost and that the circuits are chosen at install time — adding one later means calling the electrician back.
| Method | Typical installed cost (2026) | Powers hard-wired circuits? | Permit usually needed? |
|---|---|---|---|
| Extension cords | $60–$200 (cords only) | No | No |
| Interlock kit | $150–$600 | Yes — whole panel | Yes |
| Manual transfer switch | $500–$1,500 | Yes — chosen circuits | Yes |
| Automatic transfer switch + standby generator | $5,000–$15,000+ | Yes — automatically | Yes, plus gas permit |
Cost ranges are national estimates as of 2026 and vary considerably by region, panel condition and how far the panel sits from a suitable exterior wall. Get two quotes.

Transfer Switches and Cords: Top Picks
The Ranked Field
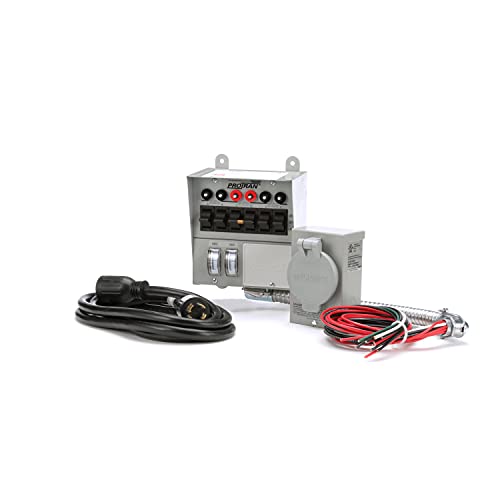
Best for the standard American home-backup install, fitted by a licensed electrician
- 30 amp, six circuits, rated for generators up to 7,500 watts
- Includes the power inlet box and a 10-foot cord
- Individual watt meters so you can balance the load live
- UL listed and NEC compliant when installed correctly
Why buy it: the most-installed residential transfer switch in the country, which means any electrician you call has almost certainly wired one before — that alone saves money on the install.

Best for houses with a well pump, a sump pump and a furnace that all need covering
- 30 amp, ten circuits including two 240V pairs
- Handles a 240V well pump or water heater circuit
- Watt meters on both legs for balancing
- Pro/Tran2 body designed for faster electrician installs
Why buy it: six circuits sounds like plenty until you count furnace, fridge, freezer, well pump, sump pump and a kitchen outlet — ten is the size most homes actually need.
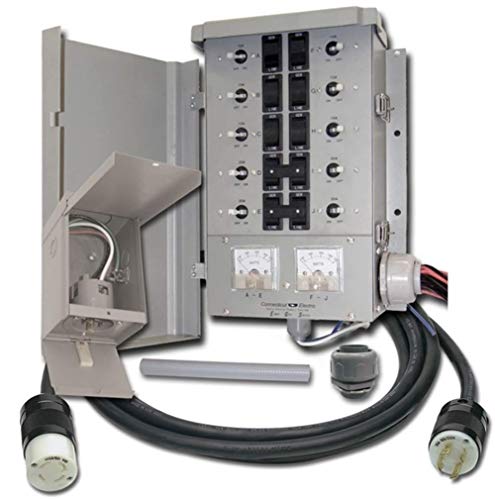
Best for ten circuits at a lower installed cost
- 30 amp, ten circuits, up to 7,500 watts
- Includes inlet box and 10-foot generator cord
- Toggle switches per circuit rather than watt meters
- UL listed
Why buy it: ten circuits for close to the price of a six-circuit rival, at the cost of the live watt meters — a fair trade if you already know your load.

Best for a straightforward install where a full circuit-by-circuit panel is overkill
- UL and CSA approved manual switching
- Made in the USA
- Physically prevents the generator and utility being connected at once
- Simpler wiring than a multi-circuit sub-panel
Why buy it: the mechanical impossibility of connecting both sources at once is the entire safety argument, and a simpler device does that job just as absolutely.

Best for pairing with a transfer switch or an interlock kit that ships without a cord
- 25 feet of 10/4 STW cable with L14-30 twist-lock ends
- Weatherproof recessed inlet box included
- Rated 125/250V, 7,500 watts
- ETL listed
Why buy it: a cord and inlet bought as a matched pair removes the single most common install headache — a connector that does not fit the box you already mounted.

Best for reaching the required 20-foot minimum distance and then some
- 50 feet of 10 AWG four-conductor STW cable
- L14-30P to L14-30R twist-lock connectors
- Rated 125/250V, 7,500 watts
- Cold-weather flexible jacket
Why buy it: the 20-foot CO clearance is a minimum, not a target, and a 50-foot cord lets you site the generator genuinely away from the house rather than just outside it.

Quick Comparison
| Product | Best for | Rating | Price | Buy |
|---|---|---|---|---|
| Reliance Controls 31406CWK 30 Amp 6-Circuit Pro/Tran Transfer Switch Kit for Generators | Best Overall Transfer Switch | — | Check (paid link) | |
| Reliance Controls 310C Pro/Tran2 30-Amp 10-Circuit Manual Transfer Switch | Best 10-Circuit | — | Check (paid link) | |
| Connecticut Electric EmerGen Transfer Switch Kit, 30 Amp, 10-Circuit, 10-Foot Cord, 7500 Watts | Best Value | — | Check (paid link) | |
| The Original, Patented, UL/CSA Approved Manual Transfer Switch | Best Simple Interlock Alternative | — | Check (paid link) | |
| CircleCord 4 Prong 25 Feet 30 Amp Generator Extension Cord and Inlet Box with Locking Connector | Best Cord and Inlet Kit | — | Check (paid link) | |
| PlugSaf 50FT 30 Amp Generator Extension Cord 4 Prong, NEMA L14-30P/L14-30R 10 Gauge STW 125/250V | Best Long Cord | — | Check (paid link) |
What the install actually involves
This is licensed electrical work on service equipment. It is described here so you know what you are buying and can judge a quote — not as instructions.
- Load survey. The electrician identifies which circuits go on the transfer switch, checks the amperage of each, and confirms the generator can carry them. A 3/4 hp well pump is usually the deciding load.
- Inlet box siting. A weatherproof power inlet box is mounted on an exterior wall, positioned so the generator can sit at least 20 feet away with exhaust pointed away from the house. This is a safety decision, not a convenience one.
- Conduit and cable run. Cable is run from the inlet box to the transfer switch or panel in appropriate conduit.
- Circuit migration. The chosen circuits are moved from the main panel into the transfer switch, or an interlock plate and backfeed breaker are fitted.
- Balancing and labeling. Loads are distributed across the two 120V legs so the generator is not lopsided, and every switch is labeled.
- Test and inspect. The electrician runs the generator and tests each circuit under load, then the jurisdiction inspects the work.
Half a day is typical for a straightforward job. The National Electrical Code (NFPA 70) governs the work, but it is adopted and amended state by state and city by city, so the details that apply to you are local. Confirm with your building department before work starts.

Choosing the cord between generator and inlet
The cord is a real component, not an accessory, and undersizing it causes voltage drop that makes motors run hot.
| Generator outlet | Cord type | Minimum gauge | Carries |
|---|---|---|---|
| L14-30R (4-prong, 240V) | 10/4 STW or SJTW | 10 AWG | 30 A, 7,500 W, 120/240V |
| L5-30R (3-prong, 120V) | 10/3 STW | 10 AWG | 30 A, 3,750 W, 120V only |
| TT-30R (RV, 120V) | 10/3 RV cord | 10 AWG | 30 A, 3,600 W, 120V only |
| 14-50R (4-prong, 240V) | 6/4 SOOW | 6 AWG | 50 A, 12,500 W, 120/240V |
Over about 50 feet, step up one gauge to limit voltage drop. Use only cords with a molded, listed connector — an adapter improvised from a household cord is a fire waiting for the right night. Full rankings are in best generator extension cords.
Operating the setup safely once it is in
- Start the generator outside first, let it stabilize, then switch circuits over. Switching under load stresses contacts.
- Site it at least 20 feet from the house with the exhaust pointed away, on a level surface, never in a garage, breezeway, carport or covered porch.
- Bring load on in stages. Let the largest motor start with nothing else running, then add smaller loads.
- Balance the two legs. If your switch has watt meters, use them; a badly unbalanced load overheats one winding.
- Shut down and let it cool before refueling. Gasoline on a hot muffler ignites.
- When utility power returns, switch circuits back to Line first, then shut the generator down — not the other way around.
Where to go next
If you have not chosen a generator yet, size it first in what size generator do I need, then compare machines in best generators for home backup. The cost of the permanent alternative is broken down in how much a whole-house generator costs, the grounding question is answered in how to ground a portable generator, and wet-weather operation in can you run a generator in the rain. Everything sits under the power tools and workshop hub.
We never buy or install the equipment we rank — verdicts come from aggregated owner reviews, published specifications and code documentation. The method is on how we rank.